Living Wall!


The second wall is more complicated. First, we took the modules off from the wall, and we found the soils are very wet, especially the soils on the bottom of the wall. From the right picture, we can see how wet the living wall was. 2.jpg

Then we put the modules on the floor and clean them one by one. It was not very easy to wash those modules. Later we put soils back to those modules and planted new plants into modules.

3.jpg4.jpg

All done! I learned about the ecosystem, planting design, and construction of living wall from this work.

Green Roof Experiential Learning Blog 3

This time we will work on the living wall. The first step is to install irrigation system from the inlet of water. And arrange the irrigation pipes along the upper side of each planting bags on the wall.

After installation of pipes, we need to take out the existing blankets with old soil inside in the each bag to empty them and wrap the plants with them. Then put the wrapped plants into each bags. Our basic principle of arranging plants is based on theory that short plants on the bottom, tall plants on the upper layer and same plant species are arranged together side by side.

However, the process of putting plants into the bag is really a tough work due to the restricted space provided by bags, which is really difficult to squeeze the plants into such a small space. Also the space above bag is also small which makes the leaves of plants bend outward. So in my opinion, the distance between upper side and lower side bags can be wider.

IMG_8770  IMG_8777IMG_8772

Overall, the green roof internship in this semester is almost done. I really learned a lot from these practical operations of selecting plants, making soil base, planting vegetation and acquire some knowledge about the installation of irrigation system, which would be a greatly valuable experience in my life. I hope this project can be continued in the future.

Studying Abroad from China, by Zhilin Huang

I’m Zhilin Huang, a landscape architecture student studying abroad from China at Texas A&M University. My professor, Donghui Peng, back in China from the Fujian Agriculture and Forestry University (FAFU) is also in here at Texas A&M doing research in Horticulture. He has a green wall experiment program in FAFU. The goal of the program is to build a material company that uses a green wall technique for the exterior wall tiles. Dr. Peng joined a class and counted the survival rate and death rate of plants with us. After that, he gave us some suggestions about how to improve the green walls that we are working on. In my opinion there is a problem with the irrigation system in wall 2 and the shape of the modular is not suitable for adequate root growth.

Although many difficulties lay in the way, we can still learn something from the failures and go through them. Despite the hardship we experienced in vertical gardens, there are some good results in the roof garden. The vegetables grew very well and I really enjoyed the time eating the crops we took care of and harvested. Next time we will remove the dead plants and plant some new ones in the green walls.

I’m looking forward to doing them.


1 2

Living wall blog by Zhilin Huang

In the last few weeks of the LAND 485 Special Topics green roofs and green walls course, we removed the dead plants from the old modules, and then refilled the soil for those modules. After that, we transplanted the new arriving plants to the modules and then put the modules back to the wall.

In this semester, I learned a lot from this course, and I also learned the experiments could take a long time to be tested, applied, and retested. The ideal green roof technology has a large potential market in the future.

The green wall technology will be well placed to expand in the Chinese market. In China, there are millions of people living in apartments where the private outdoor gre  en space is limited. Those residents are also entitled to the right of enjoying the nature, but it is really hard in the skyscrapers, so most of them place some flowerpots or plantings on their balconies. However, the arrangement of the flowerpots is usually the same and very boring, some people don’t have time to walk into their balconies and cannot take enough care of them. It might because the flowerpots in the balcony are far away from people’s daily activities area and residents in China prefer to use balcony to dry their clothes. Although this may be the common problem, we can still use some simple equipment to build a green wall at home by ourselves. The reason why green walls are going to be popular in China is because green walls can utilize the vertical space instead of horizontal space in people’s homes. So they would like to have green walls in their balconies, either designed by themselves or by the real estate developer.

2

Plants arrive and are unpacked.

1

Plants are inserted into modules and hung on wall.

3

Plants inserted into large module.

Plant Identification for Green Walls by Zane Pace

One of our first tasks this semester was to identify potential plants for replanting two of the modular green wall systems in our experimental setup. Last year, we replanted wall 2, the one with the pockets I dislike so much, and now it is time to select plants for walls 1 & 3. I’ve found that I enjoy the process of researching and identifying potential plants for use in green roof and wall systems, so I wanted to use this space to enumerate some of the more crucial aspects of the process. These include characterizing the site, identifying required plant traits, and then searching for a match.

The first step in the process is identifying the microclimate that the wall system will inhabit. In our case, since we are working on walls installed on the exterior of a building, the regional climate plays a large role in this. Many living walls you may see on pinterest or wherever may be inside buildings, and for those, local exterior conditions may not be as important. In our case, however, it is important that the plants are hardy enough to survive in the climate of central Texas. That means USDA Hardiness Zone 8B.

Microclimate, of course, implies that there are smaller-scale climactic variables that affect the walls. These include things like sunlight and wind patterns that are affected by the built context of the site. All of our systems are mounted on the south facing walls of a rooftop enclosure on top of the Langford architecture complex here at TAMU. The other walls of the enclosure provide wind shelter for the site, but also affect levels of shade throughout the day.

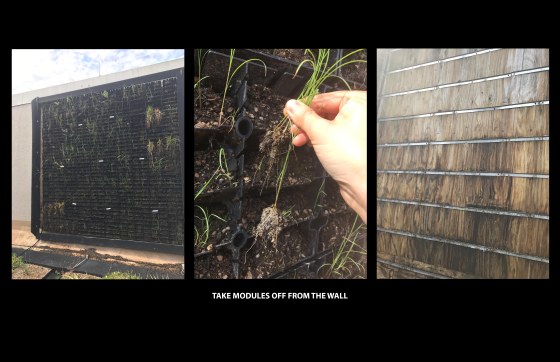
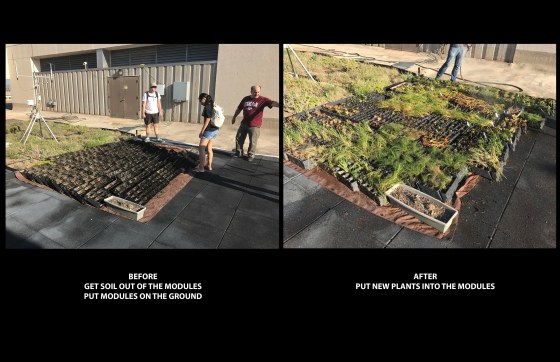
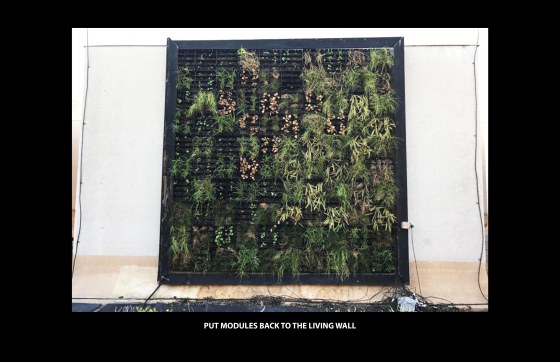
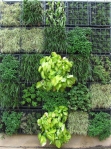
All of these considerations are further refined by the differing designs of the systems themselves. These vary in terms of plant positioning, substrate depth & composition, and irrigation design. For example, Wall 1 uses modules with 8 compartments that project out from the wall at a slight upward angle, maybe 30 degrees. The slots in bottom dividers allow irrigation to trickle down from module to module, and the plants grow at an angle. This would seem optimized for plants that are commonly grown in pots and tend to produce foliage that cascades down. Unfortunately, the slots only go part of the way down the module divider, and the bottoms of the compartments often fail to drain and can get waterlogged. Therefore, moisture tolerant species may be necessary. Wall 3, on the other hand, uses large, boxy modules that each hold one large bag of substrate. There is no angle in this system, and also no dividers within the modules. This provides greater nutrient access for plants, but also allows greater competition among species, and requires they grow straight out from the wall.

Having characterized the unique concerns of each system’s microclimate and gained a sense for the constraints that plants will have to cope with, we can develop out some desired trait parameters and go research. I primarily did this using the wildflower.org database that allowed me to sort plants based on criteria. For example, Zone 8, full-sun, perennial, 0-18” tall, and moist-wet soil tolerant. Then one can sort through that entire list for plants that combine those characteristics with aesthetic appeal. Sounds a bit boring, right? It is.

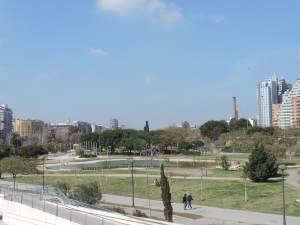
What’s more fun is to go out into the community and identify plants already growing in sites with similar microclimates to the roof. This is the ‘go out in nature and find plants growing I those conditions’ method, and I did it constantly on a recent trip to Spain. In Valencia, I encountered several plants in environments that made me think. Valencia sits astride the former riverbed of the Turia river, which was diverted mid-century because it kept flooding. The entire riverbed was converted into a park that basically runs the length of the city. It’s cool.

DSCN0459 DSCN0446

See?

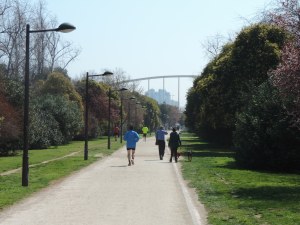
When the entire park is probably 15-20 feet below street level in the city, and as such, the former riverbanks are now large walls that simulate the environment on the roof quite well. The park and street level are connected by long ramps, the sides of which are more intentionally vegetated, but also steep and providing a natural comparison to our site. I found numerous plants growing in a crack in the wall or tumbling down the side of an embankment that I thought resembled our wall environments.

IMG_0934 IMG_0969

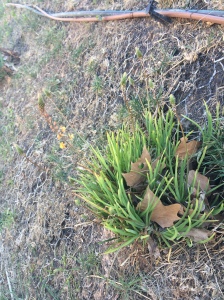
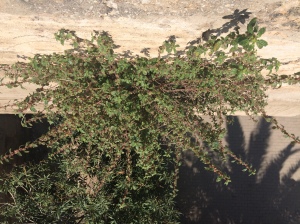
The first one is growing out of the side of the embankment, the first is just popping out of the side of a bridge.

These discoveries not only gave me plant ideas, they also helped me identify useful characteristics I had not considered, and helped refine my search process. Seeing plants growing in nature also sheds light on how people relate to the species, on the subjective experience of interacting with that plant. This is an important consideration, as the human impact of green roofs/walls is just as important as any environmental or resource efficiency benefits they impart.

Working with green walls, variation among systems by Zane Pace

The tail end of the semester has seen the arrival of plants we ordered to replace the walls and winter food crops, and more hands-on work with the systems themselves than we had previously undertaken. That means taking down the systems to install new plants, which has afforded us wonderful insight into the design of the systems and the amount of work that goes in to plant establishment and preparation for a green wall. This experience could prove invaluable as we look to design more efficient systems or expand them in scale, as it provides a look into the technologies and structures that facilitate flows of energy and nutrients in artificial ecosystems.

One useful aspect of the experience is the chance to work with multiple wall systems. There are three living walls included in our experimental setup, each with its own unique design and microclimate. I’ve written about these before, but I’ll review anyways. Wall 1 consists of modules angled upwards, out from the wall, that are divided into 8 plant compartments each. These provide a not exactly horizontal growth environment for the plants. The modules for wall 2 consist of 3 rows of 4 felt pockets, each holding one plant. These units are larger, and would be difficult to remove, but allow plant care can be carried out on an individual pocket basis. The soil reserve is vertical, allowing plants to grow more-or-less vertically. Wall 3’s modules are large, rectangular plastic skeletons that hold bags full of growth medium and plants. They are definitely the heaviest module to interact with, and also more difficult to replace the plants for. They also require that plants grow basically horizontally out from the wall.

Wall 1, Modules on the ground

Wall 2. The problem with pockets.

Wall 3: modules establishing

Working on three unique green wall designs side-by-side reveals the relative strengths and weaknesses of each design. Opening them up and pulling them apart allows us to infer the strategies that informed each design decision, and presents a collection of alternatives. The walls have been in use, “functioning” to various degrees, for something like a year or more prior to this replanting, meaning we know which aspects of a given system aren’t performing optimally. Through the replanting process, we’ve been able to see behind the green wall and appreciate the design of the various irrigation systems to a degree not possible when those systems are embedded behind a bunch of plants. We can start to trace the causes of any deficiencies in these systems, and have several alternatives on-hand to compare.

Since we took the modules down to replant them, they have largely been left to establish off the walls. This is in part because some systems recommend an establishment period of several weeks prior to hanging the modules on the walls, and in part because plants arrivals are staggered and we need to hang all the modules at once to implement our design. Comparing the systems during establishment sheds light on their effectiveness and how they could be improved, but more than that it highlights an important consideration for sustainable and biophilic design. That is time.

It takes considerable time for any natural system to establish and develop. It is important to remember these time-scales when we think about sustainability, whether in terms of projects or in terms of developing sustainability at a social level. The establishment of a green roof or wall is an evolutionary process, and so is the establishment of a green society. We have to let the strong root structures that can support such a society develop and then spread throughout the substrate of our culture before we proclaim it ready to hang up and call done. The diffusion of the ideas and technologies that will drive a sustainable, global human civilization takes time, and we must be understanding of those who lag behind. It is easy to grow discouraged about humanity’s prospects when we see parents and role models ignoring the signs that we must move towards sustainability, carrying on with ecologically profligate lifestyles. But that disappointment stems from the same desire for instant gratification that got us into this mess in the first place. We must start playing the long game ourselves, if we want society to follow us and do the same.

Green Roof Experiential Learning – Spring 2015 Blog 2 by Nicole Forbes

Spring is here (well as close as you can get to spring here in Texas) and with it has come a revival of plant and crop life! The mint has come back with a vengeance and some of the other plants that were looking dreary are greener than ever!

Nicole blog 2 photo 1

Zane and I presented our green roof crop research at Student Research Week the week after Spring Break. It was an awesome and rewarding experience. It gave me experience both in poster making and presenting research to a group of judges, I hope this experience will help me in future research presentations.

Nicole blog 2 photo 2

Other than Student Research Week, we have continued harvesting and have begun to take down the living walls. There is not too much to report this time, but we will be redesigning the living walls and planting new crops and plants. I will also be looking after the crops over the summer after I get back from a month trip to Costa Rica! I’m looking forward to finishing the semester out!

Nicole blog 2 photo 3

Green Roof Experiential Learning – Spring 2015 Blog 1 by Nicole Forbes

I’m back again for my second semester working on the Langford Green Roof Project! It has been an awesome experience to be a part of this while watching the plants grow and new ideas transform. I really have not got to do too much yet this semester as weather has been bad and I was in Costa Rica for a week, but weather is supposed to be getting better so hopefully next blog I will have more to report. Zane and I will also be presenting a poster at Student Research Week after Spring Break which should be a very rewarding experience. I will be sure to get pictures for my next blog!

My first day back on the roof was really cool to see. I assumed with the weather being so cold over the winter break that most of the plants would not fare so well but I was thankfully mistaken. Many of the plants grew very well on the roof modules. The lettuces and herbs did very well (except for the bell pepper basil, all of that died out for some reason), especially the parsley. I think a roof of parsley and mint would grow exceptionally well here in Texas year round and would create a beautiful green garden that can be used for cooking also! The living wall was disappointing, however. Mostly everything died out or is looking very bleak, with exception to the garlic and shallots which seem to be doing fairly well. I am hoping some of the mint recovers and grows back, but only time will tell.

It was also very interesting to see how some crops did well in certain spots, while in others they did not survive. I saw this with the turnips, beets and red kitten spinach. There are many reasons as to why this occurred, but I lean more towards three explanations:

  1. Irrigation – Something is going on with the irrigation system and plants are being watered unevenly
  2. Sunlight – Different spots on the roof get different amounts of sunlight which is affecting growth rates
  3. Nutrition – Some spots received more fertilizer than others

As we approach the planting season for summer crops, these are the crops that I think we should plant:

  1. Herbs – I think we should plant more of the herbs that did well (parsley and mint) and I think we should also try cilantro and dill, both of which grow very well at the Howdy Farm on campus and I would be curious to see if they do well on the roof also.
  2. Broccoli – I know we planted some in the fall but I am curious to see if it would do better in the spring as broccoli likes direct sunlight (which there is plenty of on the roof) and has a moderate maturity rate.
  3. Cabbage – With how well the lettuces did, I really would like to see how cabbage fairs. However, cabbage has a much longer maturity rate so I am not sure if that will affect the decision.
  4. Bush beans – These mature quickly and I think they would be really cool to try and grow.
  5. Lettuce and spinach – These did well so I think we should try them again in the spring to see if they grow well during this time also.


Below are pictures from the first day back on the roof!

Nicole photo 1Nicole photo 2

Nicole photo 3


Green Roof Experiential Learning – Spring 2015 Blog 1 by Martha Todd

The first week of class we began harvesting and weighing vegetables that were growing in modules on the roof. I was surprised at how healthy and plentiful all the vegetables were. There was a variety of crops too, including Italian parsley, cilantro, spinach, and even turnips! It was interesting to notice though how the crops on the ground had done so well; however, the plants on the wall were all dead with an unknown specific cause. It is possible that the plants on the wall could come back after winter but little growth was noticed throughout the weeks even when we trimmed the ends of the plants in order to spur new growth. It could also be due to the restricted space the plants are given as they are seated in small pockets along the roofs walls or due to a lack of or surplus of moisture. We hope that over the semester to identify what the problem is and correct it in order to ensure better and healthier plants that can live year round.

Now the planning remains as to what plants should replace those that are dead. After an excellent presentation by Professor Dvorak, who introduced me to the famous botanist Patrick Blanc, I could visualize what our goal was on the top of the Langford Architecture building. We need to find plants that are evergreens and can live all year round and find crops to grow on the modules that rest on the ground of the roof as opposed to the other plants that grow vertically along the wall in pockets. Some of the edibles I would like to plant in the ground modules are rosemary, tomatoes, bell peppers, basil, and cilantro.

Finally, there is one more side to the project and that is using sensors to track some of the plant’s growth and how they are doing in the given living conditions. Dr. Conlee and his students came and together we programmed sensors that can sit in the soil with plants that will be growing on the wall. Eventually we hope that this data will help the class to make conclusions on the influence of a green roof on albedo levels as well as the amount of long wave and short wave energy that is being transmitted

Green Roof Experiential Learning – Spring 2015 Blog 1 by Ivan Mendoza

Howdy. My name is Ivan Mendoza. I’m an undergraduate senior in Horticulture. I am taking this greenroof experimental course so that I can see which plant species thrive in this area of Texas on green roofs. As a perspective landscape architecture student, I’m hoping I can use the knowledge I gain from this course and hopefully apply it to future landscape and commercial designs. When we started this spring semester, we had edibles in place on modules which were planted last spring.  We also have 3 living walls in place. The first living wall has succulents and sedges in place, the second has strawberries, mints with some other perennials, and the third has a mixture of perennials. The first day we recorded inventory of the number of edibles for each species that was still alive on each module. The majority of the edibles that were planted last spring did fairly well, except for Basil (Bell Pepper), Chinese cabbage (Rubicon), Radish (Easter Egg), Turnips (Hakurei) and a couple of varieties of other species. The growth size of the edibles that did well varied across the modules due to external factors (light, water, wind, etc.)  Following, we harvested the edibles to have them regrow new foliage and recorded the data.

Ivan photo 1

Ivan photo 2


We have also cut any flowers that have been growing on the edibles so that they focus their energy more on growing. Slow release fertilizer has also been applied on these edibles which has helped them grow as well. We have been focusing on which edibles we are going to plant later this spring as well as the perennials we need to replace on the living walls (especially living wall 3). We notice that rosemarinus officinalis, ficus pumila, and artemesia “powis castle” are some the species regenerating growth on living wall 3. We have been trying to figure out why the other perennials on living wall 3 have not done so well. We do not have any information collected to try and narrow down the problem. We will come up with a list of edibles and perennials to plant on the modules on the roof and on the living walls.  This class has been very interesting so far and I am excited to see what our proposed plant species do in the future.

Living Wall 3

Ivan photo 3


Living Wall 2

Ivan photo 4 _ living wall 1


Living Wall 1

Ivan photo 5

Living Wall 2 construction, by Juan Carlos Vela

Week of July 29th to August 2nd

Using the plants that were wrapped the previous week, we managed to complete the entire new living wall. Granted, it took several hours of hard work and labor, but seeing the end result made it all worth it. However, while working on the wall, we did notice that some of the plants had undergone a lot of stress and a few had already wilted beyond repair. One of the reasons we thought of for this problem was the lack of sufficient water during the day. Because this is perhaps one the hottest times of the year, many plant species require frequent watering to survive. One other possible explanation for this could have had something to do with placing the plants in the pockets too soon after transplanting them from their original containers. Upon further inspection, though, we determined that the issue was most likely associated with lack of water since many of the irrigation lines were trapped beneath the plants, hence blocking the flow of water. Fortunately, we were able to correct this by simply pulling the irrigation lines from underneath the plants; thus, allowing the water to flow freely again. As such, it is important to ensure that irrigation lines are kept free of any impeding factors so as to avoid blockages and plant stress.


July 29th-August 2nd_photo1

Living wall #2 near completion.

Living Wall 2 construction, by Juan Carlos Vela

Week of July 22nd to July 26th

When working on a project this large and complex, it is always best to have a decent-sized group to work with so as to get things done in a timely and efficient manner. Fortunately for us, we were able to enlist the help of some very eager and hard-working Master of Landscape Architecture students this week to help with the wrapping of plants. After showing them how to wrap the plants, we spent about three to four hours wrapping up as many of them as we could. By noon, we had managed to wrap up most of the plants that were sitting out in the greenhouse.

July 22nd-26th_photo1

First year Master of Landscape Architecture students.

July 22nd-26th_photo2

Plants wrapped and stored in the green house until the following week.

Living Wall 2 construction, by Juan Carlos Vela

Week of July 15th to July 19th

After wrapping up a few more plants this week, we continued planting the second living wall, which seemed to be doing pretty well despite the harsh summer heat and dry conditions. While wrapping up the plants, we made sure to include enough soil to sustain the plant over time. We also did our best to maintain a balanced ratio between the roots and shoots on each plant to avoid stressing them out. Without this balanced ratio, the plants run a high risk of going into a state of shock when transferred from their original pots to the harsh climate outside; thus, causing them to die off.

July 15th-19th_photo3